- Dettagli
- Read Time: 9 mins
7.1 - Making a home
Now we have animals, plants and electricity, perhaps we should set up somewhere to live where we can cook, wash, rest and generally do all the things the HUD (in health mode) requires us to do!
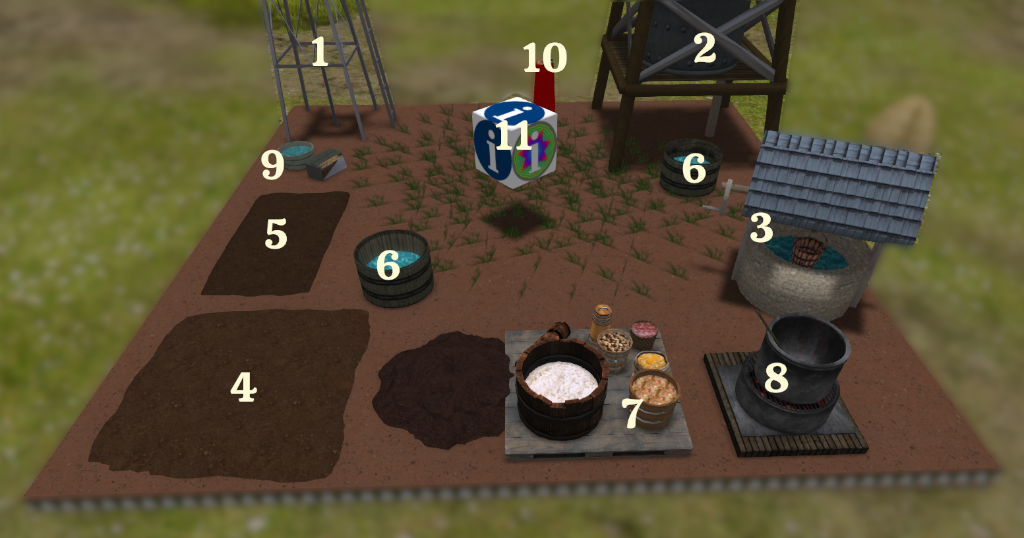
In the Household platform (box 8) you will find various items that you can use to help set up your home and look after your health and well-being. Also you will find some home cooking items in the Food and drink platform (box 7)
7.2 - Surfaces
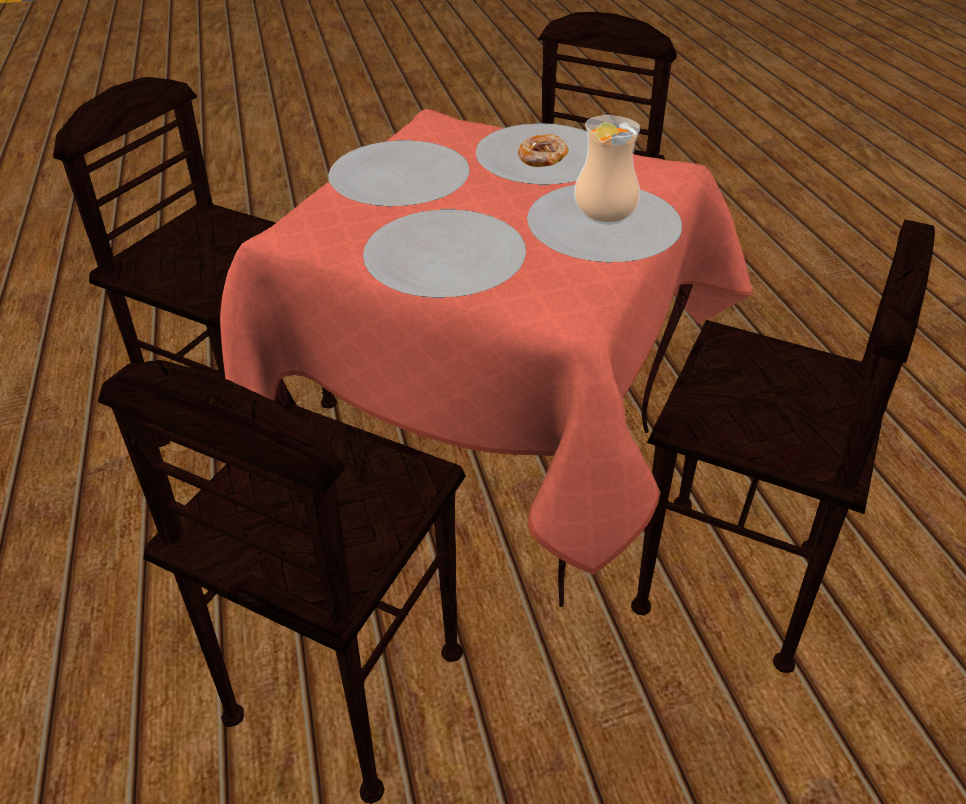
Most food items that you make are set to look for a ‘surface’ to go to. If you make something in the oven or hob etc., when it is complete it will look for the surface called SF Table and if it finds one in range (approx 20m radius) it will automatically set itself there (and the table cloth will appear!)
Surfaces allow you to place items ready for use – in the case of the table you can sit on a chair (which will increase your energy level) and then use the food item to decrease your hunger/thirst etc. Although you are sort of storing an item on a surface, unlike being in storage, items on surfaces will still age. Items that contain the surface feature may have more than one ‘surface’ – the table is an example of that as it can hold up to four items.
For more information on using and customising surfaces, refer to Chapter 13
7.3 - Change the SF Dresser mirror reflection
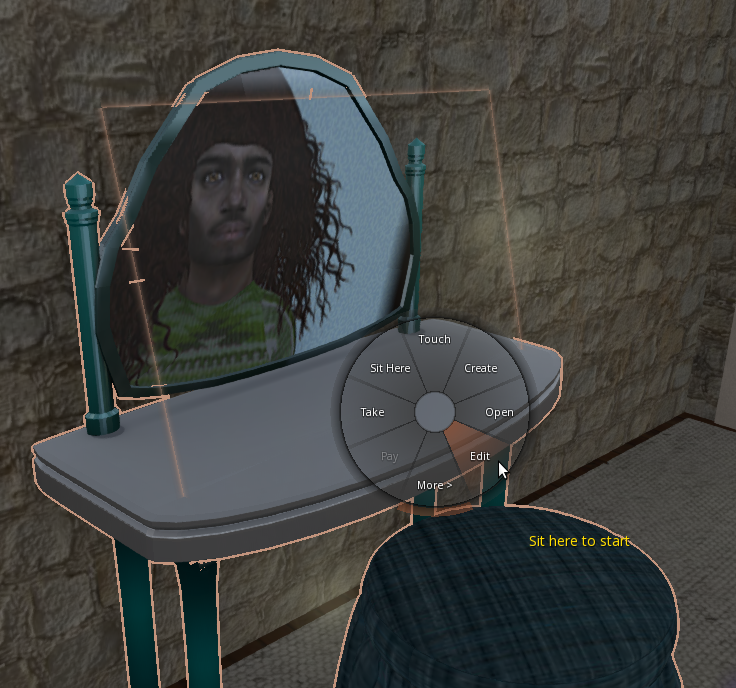
When you use the SF Dresser, a ‘reflection’ image is shown on the mirror. This is just a projected image and you can change it as follows:
First you will need to click on the dresser, select Do... and select one of the task options (e.g. Makeup) and add required items - this will then show the reflection. Don’t sit but instead right click the dresser and select Edit
Now you are in edit mode, click on the Features tab then click on the Edit linked option to select it.
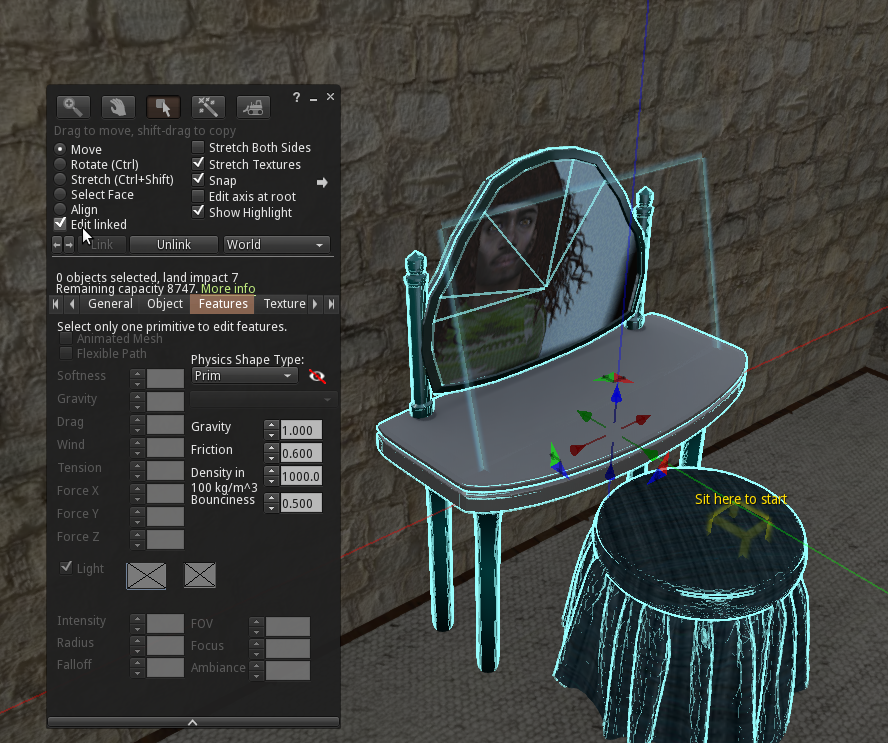
Now left click on the invisible prim to select .
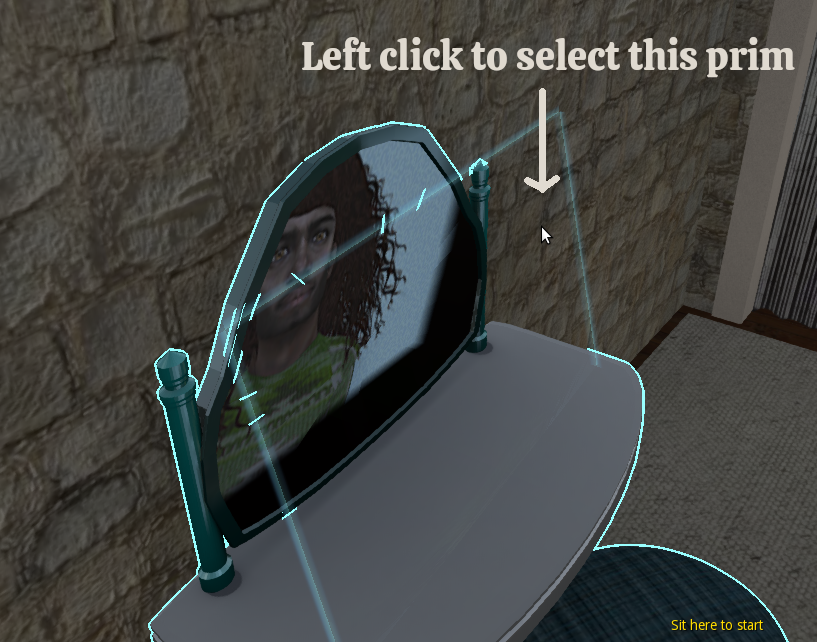
If you have selected the correct prim you will see there is now an image showing and also the Light option is selected.
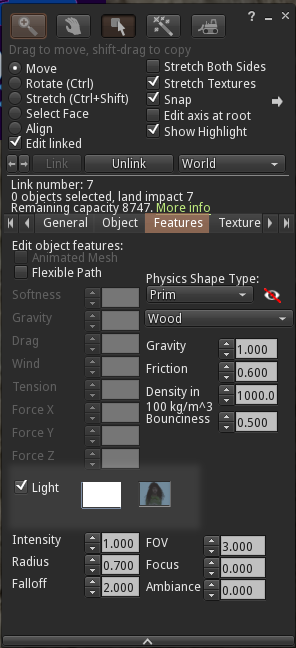
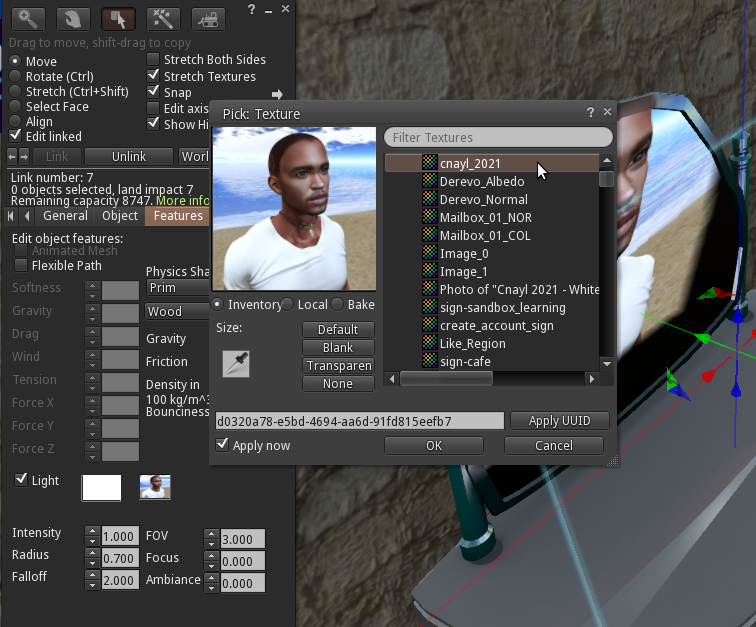
You can now left click on the image and the texture picker window will show to allow you select the image you wish to use.
Select your image and then close the edit window by clicking the top right X button.
Now sit on the dresser to complete the task.
Once the task is complete the mirror will go back to the blank screen but in future will use your new image each time you do a task on it.
7.4 - Add Health Mode to your furniture
As well as all the items available in the Quintopia boxes, it is also possible for you to add health mode support to any items of furniture etc. that you already have.
In the household platform (box 8) there are 4 kits that you can use covering the common systems of PMAC, MLP, sit scripts and also a ‘cover’ that you can place over any bed.
Converted items will send a progress message to the HUD display during use and then send the configured ‘health’ values at the end of the set time period.
(a) Config notecard
The configuration is the same for all of the kits:
# # All the following are optional overrides to the default values of:
#    TIME=120
#    HYGIENE=99
#    HEALTH=30
#    BLADDER=50
#    ENERGY=30
#    AUTO_END=1

# How many seconds to run the action
TIME=120
#
# How much to change well-being when time is up (can be positive, negative or zero)
HYGIENE=99
HEALTH=30
BLADDER=0
ENERGY=30
#
# Set to 1 for actions to end when times up, or 0 to have the avatar repeat cycle until stopped by manually selecting to stand
AUTO_END=1
The default values in the initial comments will be used unless overridden in the notecard, so you only need specify those that you wish to have a different value from the default.
If AUTO_END is set to 1 then you will automatically stand at the end of the specified time interval. If you set it to 0 then you will remain seated and the values for health, hygiene etc. will be sent to your HUD after every time interval. You manually select Stand to end the actions.
(b) PMAC Addon kit
This kit allows you to add the health mode functions to anything that uses the PMAC (Paramour Multi-Animation Controller) system. It consists of the script addon-pmac_health and the config notecard and also a notecard called sfp
You place these items into your PMAC furniture in the following order:
-
Add the notecard sfp to the main prim of your furniture
-
Add the notecard config to the main prim of your furniture
-
Edit the config notecard if you wish to change any settings
-
Add the script addon-pmac_health to the main prim of your furniture
If you see a 'bad password' message, re-set all scripts.
Your PMAC furniture should now operate as it did before, but when people are ‘seated’ their HUD will receive the health values as configured.
Information on the PMAC system can be found online at https://github.com/uriesk/pmac
(c) MLP Addon kit
This kit allows you to add the health mode functions to anything that uses the MLP (Multi Love Pose ) system. It consists of the script addon-mlp_health and the config notecard and also a notecard called sfp
You place these items into your MLP furniture in the following order:
-
Add the notecard sfp to the main prim of your furniture
-
Add the notecard config to the main prim of your furniture
-
Edit the config notecard if you wish to change any settings
-
Add the script addon-mlp_health to the main prim of your furniture
If you see a 'bad password' message, re-set all scripts.
Your MLP furniture should now operate as it did before, but when people are ‘seated’ their HUD will receive the health values as configured.
Information on the PMAC system can be found online at http://wiki.secondlife.com/wiki/MLPV2_Tutorial
(d) Sit/Poseball Addon kit
This kit allows you to add the health mode functions to anything that uses one or more sit scripts (sit target). It consists of the script addon-sit_health and the config notecard and also a notecard called sfp
You place these items into your MLP furniture in the following order:
-
Add the notecard sfp to the main prim of your furniture
-
Add the notecard config to the main prim of your furniture
-
Edit the config notecard if you wish to change any settings
-
Add the script addon-sit_health to the main prim of your furniture
If you see a 'bad password' message, re-set all scripts.
Your furniture should now operate as it did before, but when people are ‘seated’ their HUD will receive the health values as configured.
Information on the sit target system can be found online at http://wiki.secondlife.com/wiki/LlSitTarget
(e) SF Bed (cover)
This is just a flat prim that contains all the functionality expected of a bed. Just position it over your bed to use. You can set it to transparent and phantom.
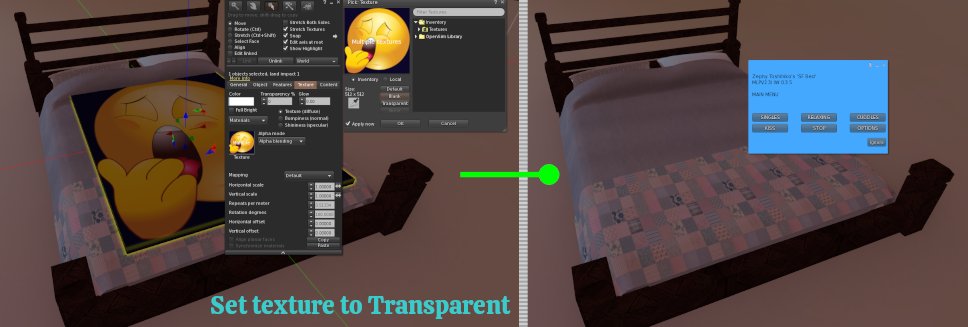
The cover uses the MLP system so you can edit the config notecard etc. As per the MLP instructions.
7.5 Cleaning, Cooking, Relaxing
By now you have probably noticed that the HUD, when in health mode, requires you to wash, visit the lavatory, eat, drink etc
A good way to make sure you can keep healthy is to set up your house with the areas/rooms such as:
(a) Kitchen
Great items here are cooker, hob, fridge, storage, table and chairs etc. Make sure to have the table within a 20m radius of where you prepare food so that the finished items will automatically go to the table.
(b) Bathroom
You can wash with the sink, shower or bathtub. A lavatory is also a welcome addition unless you prefer an outdoor privy!
(c) Living room
Somewhere to just sit and relax is a great idea. When your energy is low, just sit on a chair to let it build back up again. Lighting a fire also adds to your well-being. Some people like to put a few crafting items here as well.
(d) Bedroom
Somewhere to sleep and recharge your energy and a place perhaps to store pillows, duvets and the like. And if you are not in a G rated region, perhaps a place for a bit of woohoo!

This work by Cnayl Rainbow is licensed under a Creative Commons Attribution-NonCommercial-ShareAlike 4.0 International License.
Based on a work at https://satyrfarm.github.io/
- Dettagli
- Read Time: 11 mins
13.1 SVILUPPARE I PROPRI OGGETTI
Uno degli aspetti positivi del sistema "SatyrFarm" è che è totalmente open source e progettato per essere facilmente esteso e personalizzato. Il resto di questa guida è dedicato a come personalizzare gli oggetti esistenti e crearne di nuovi. Siamo sempre ansiosi di aggiungere nuovi oggetti alla versione in continua crescita del sistema VivoSim, quindi non siate timidi: se create qualcosa di nuovo, sentitevi liberi di condividerlo!
Probabilmente il modo più semplice per iniziare è modificare gli elementi esistenti, ma siete liberi di utilizzare gli script in altri elementi, ma vi raccomandiamo di utilizzare gli script più recenti dal repository di VivoSim all'indirizzo https://github.com/punyauk/VivoSim, soprattutto se intendete condividerli. È inoltre necessario assicurarsi che ogni elemento e tutti gli elementi che contiene nel suo inventario in modo ricorsivo siano full perm, altrimenti il prodotto non funzionerà per gli altri utenti.
13.2 MAGAZZINO
(b) Il pulsante Nuovo stock
Con questo pulsante è possibile effettuare una scansione dei prodotti vicini e tentare di aggiungerli al magazzino. A tal fine, il magazzino controlla le altre ubicazioni di magazzino che hanno attivato la modalità di condivisione (l'impostazione predefinita) e controlla anche le unità di scambio presenti nella regione. Se il prodotto viene trovato in uno di questi luoghi, verrà aggiunto a questa unità di archiviazione. Questo è un modo semplice per modificare il contenuto di un'unità di deposito, ma è limitato alla possibilità di aggiungere solo prodotti che esistono già da qualche altra parte nella regione.
Si noti che l'articolo deve avere P; all'inizio della descrizione per essere riconosciuto come prodotto. Questo è lo stato normale per qualsiasi prodotto che è stato reimpostato da una macchina, un impianto, ecc. Ma se si tratta di un articolo nuovo, è sufficiente impostare la descrizione su P;
(b) Aggiungere un prodotto al barile del magazzino SF
Probabilmente il modo più semplice per creare un magazzino per un nuovo prodotto creato è modificare il barile del negozio SF esistente. È anche possibile acquistare alcune scatole di stoccaggio vuote "modello" nel negozio Mintor. Lo script di stoccaggio si configura automaticamente per qualsiasi prodotto presente nell'inventario, quindi se si ha un nuovo prodotto, è sufficiente collocarne una copia all'interno dell'SF Store.
Esempio
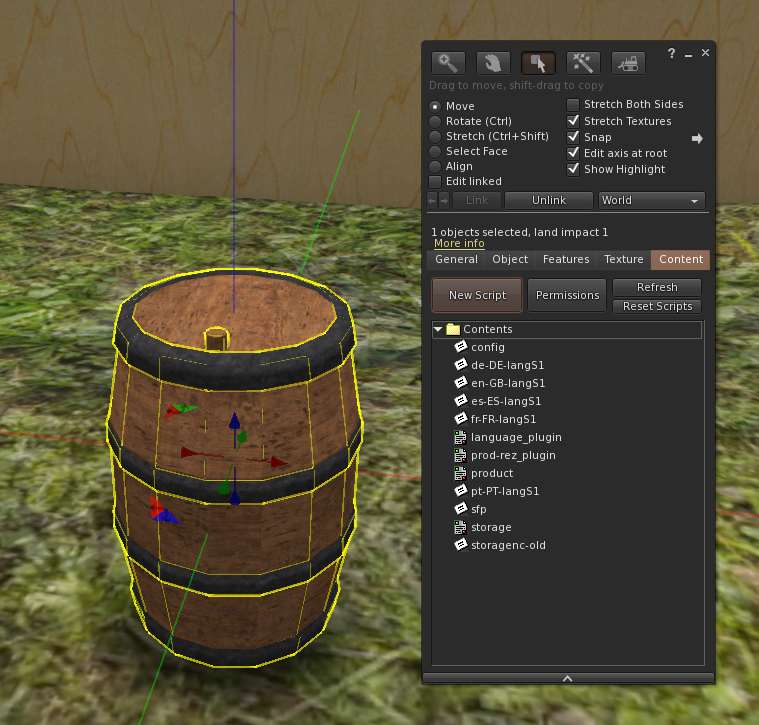
Inizieremo con il riorganizzare uno dei semplici barili di stoccaggio. Cliccare con il tasto destro del mouse per modificare e dare un'occhiata alla scheda Contenuto. Si vedranno vari script e schede che verranno trattati più dettagliatamente nel capitolo 14. Per il momento, tutto ciò che dobbiamo fare è modificare il contenuto del barile.
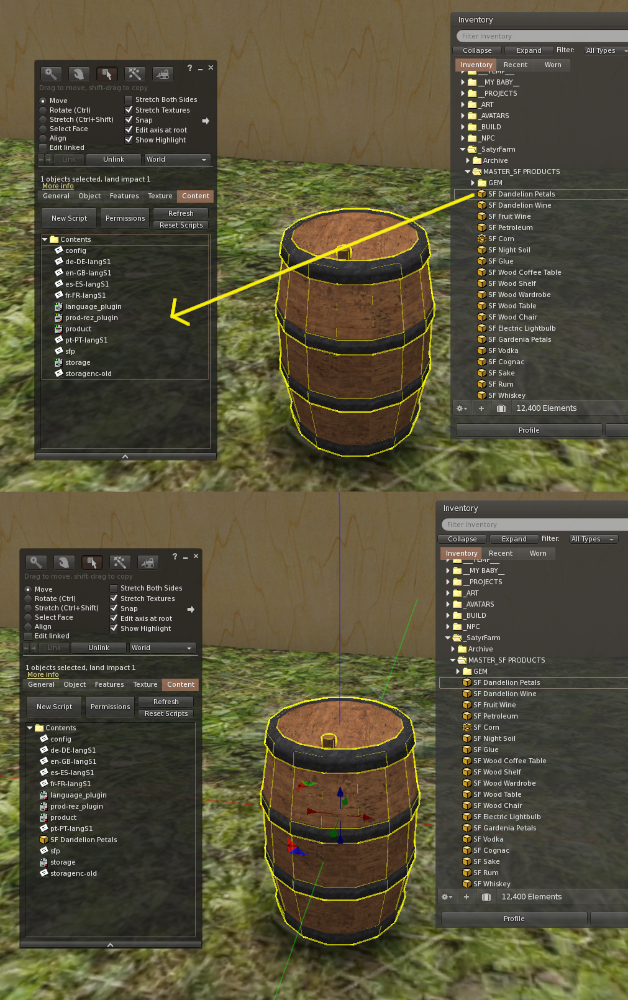
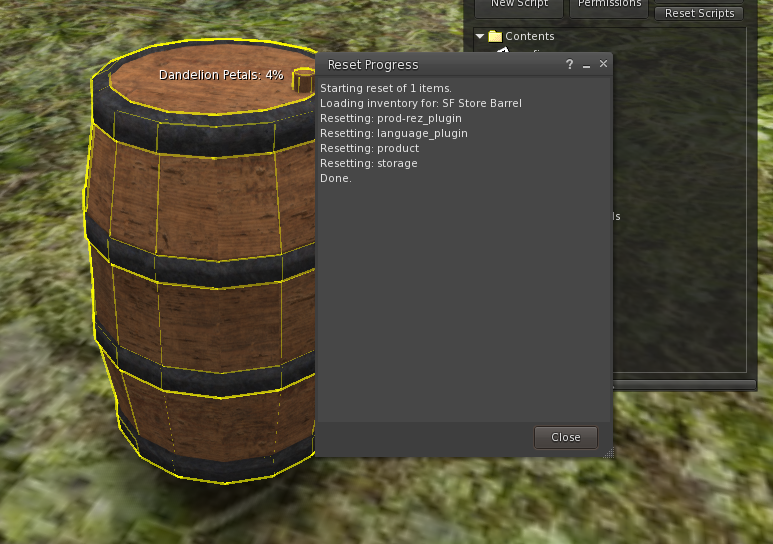
Per ora è sufficiente trascinare il prodotto dall'inventario al contenuto del barile. Ad esempio, abbiamo un prodotto a base di petali di dente di leone che desideriamo conservare, quindi lo trasciniamo dall'inventario all'area Contenuto.
Una volta trascinato l'oggetto, fate clic sul pulsante Reimposta script e vedrete che ora avete un luogo di stoccaggio per i petali di dente di leone!
Oltre al tipo di magazzino per un singolo oggetto che abbiamo appena creato, possiamo creare unità di stoccaggio che contengono più oggetti. Ci sono due tipi di contenitori: il primo mostra i livelli di tutti gli oggetti in un unico blocco di testo float. Il secondo ci consente di mostrare più testi float per ogni articolo del magazzino.
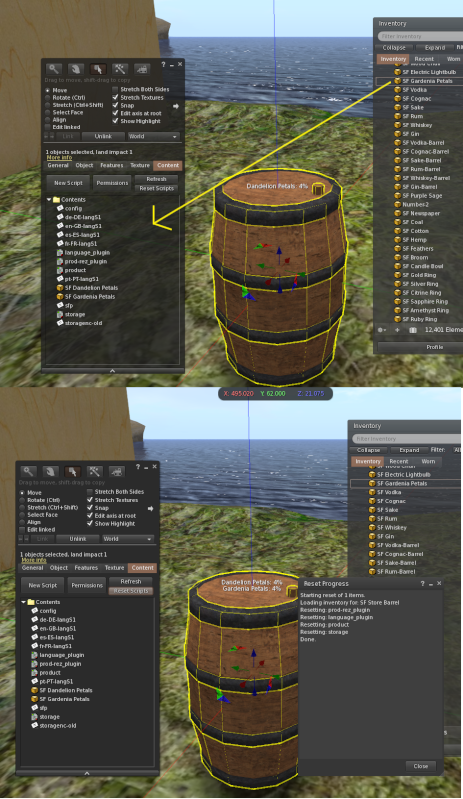
Cominciamo con il tipo di testo float singolo, poiché tutto ciò che dobbiamo fare è trascinare un altro prodotto nel contenuto del nostro magazzino esistente. Ad esempio, aggiungeremo al negozio dei petali di gardenia.
Fate clic con il pulsante destro del mouse e selezionate Modifica, quindi andate nella scheda Contenuto e trascinate il nuovo articolo (petali di gardenia nel nostro esempio), quindi fate clic sul pulsante Reimposta script e vedrete che ora abbiamo un magazzino per due articoli.
Possiamo aggiungere tutti gli elementi che vogliamo a questo tipo di archivio, ma naturalmente se ne aggiungiamo molti potrebbe essere difficile leggere da un grande blocco di testo flottante, inoltre il numero di caratteri del testo flottante è limitato e quindi potrebbero non essere elencati tutti gli elementi.
Possiamo utilizzare un altro tipo di magazzino che ci permette di avere più testi flottanti per ogni articolo - probabilmente avete già visto alcune unità di magazzino che lo fanno, come SF Basic Storage e SF Storage Rack.
La creazione di questo tipo di magazzino segue lo stesso processo che abbiamo già seguito, ma con alcuni passaggi aggiuntivi.
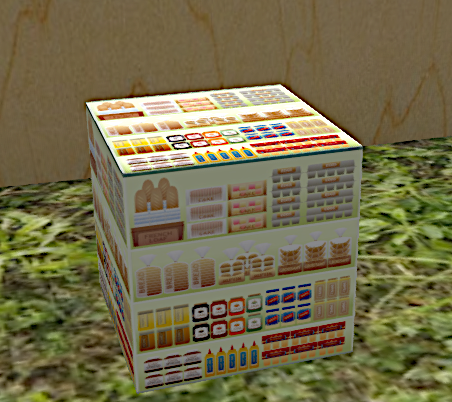
Inizieremo con il modello di magazzino SF , che è un semplice cubo che potete usare come punto di partenza per i vostri progetti. Si tratta solo di un sistema di stoccaggio vuoto, al quale possiamo aggiungere prodotti come prima. Per questo esempio utilizzeremo di nuovo i petali di dente di leone e di gardenia, in modo da vedere come questo sistema di archiviazione si confronta con il tipo precedente.
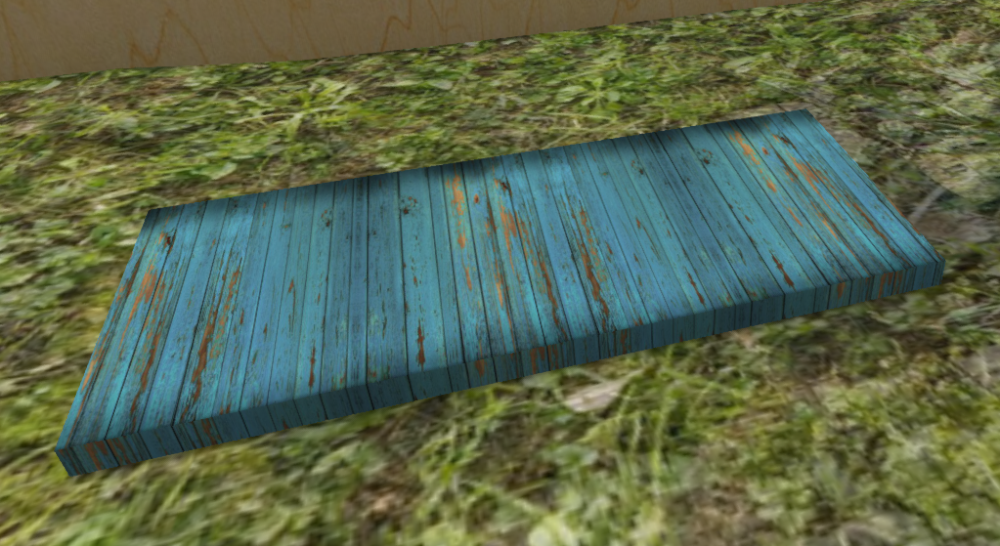
Il design del sistema di stoccaggio dipende molto da voi, ma in questo caso realizzeremo un semplice scaffale di stoccaggio.
Per prima cosa appiattiamo la scatola per ottenere la forma di una piattaforma e cambiamo la texture in legno invecchiato.
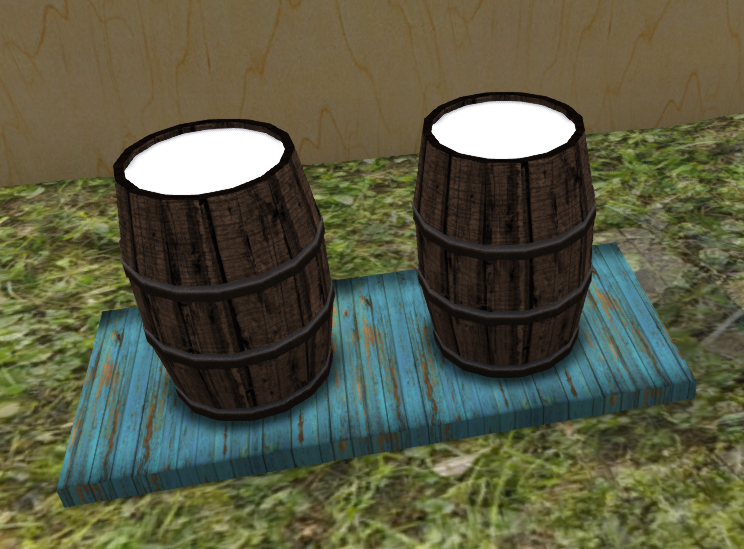
Ora dobbiamo aggiungere un prim che funga da indicatore per i petali di dente di leone e un altro prim per i petali di gardenia. Inizieremo con uno degli Store Barrels di SF che ha un prim a livello di texture, ma potete usare qualsiasi prim che si adatti al vostro progetto.
Questo Store Barrel ha già tutti i componenti di stoccaggio nella primitiva di base, ma poiché abbiamo già una base da utilizzare, staccheremo la primitiva dal negozio del barile. Poiché vogliamo indicatori per due prodotti, creiamo una copia del barile e posizioniamo entrambi i barili sulla nostra base di stoccaggio.

Colleghiamo quindi tutti i componenti, assicurandoci che la base sia l'ultima primitiva a essere collegata (quindi è la primitiva principale).
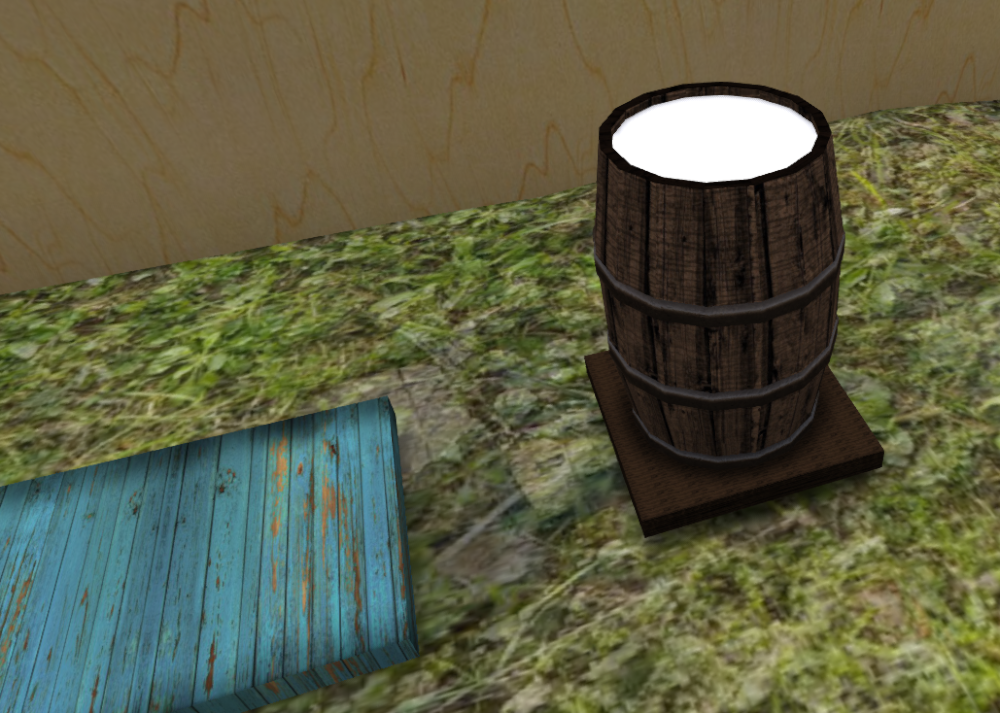
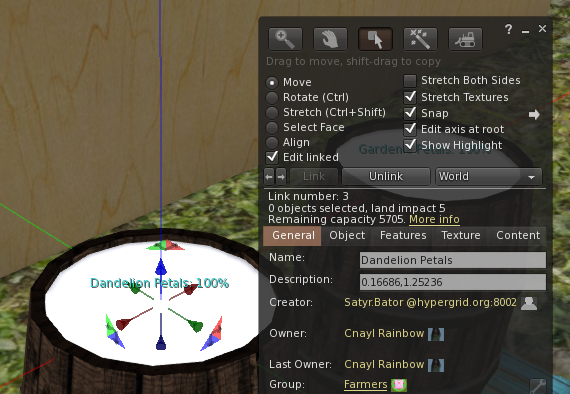
Ora dobbiamo impostare i due prim che saranno i nostri indicatori di livello. Impostiamo il nome del primer che vogliamo usare come indicatore di livello in modo che corrisponda al nome del prodotto (meno la parte SF), quindi in questo esempio imposteremo un primer chiamato Petali di dente di leone e l'altro Petali di gardenia.
Come sempre, è necessario assicurarsi che il nome e le lettere corrispondano esattamente al prodotto: ad esempio, se chiamassimo uno dei prim Petali di dente di leone , non funzionerebbe.
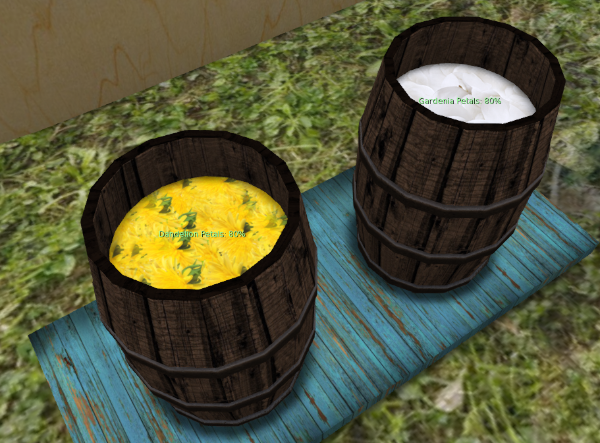
Ora non resta che aggiungere i petali di dente di leone SF e i petali di gardenia SF al contenuto del nuovo magazzino. Una volta fatto questo, si dovrebbero vedere gli indicatori di livello per entrambi i prodotti.
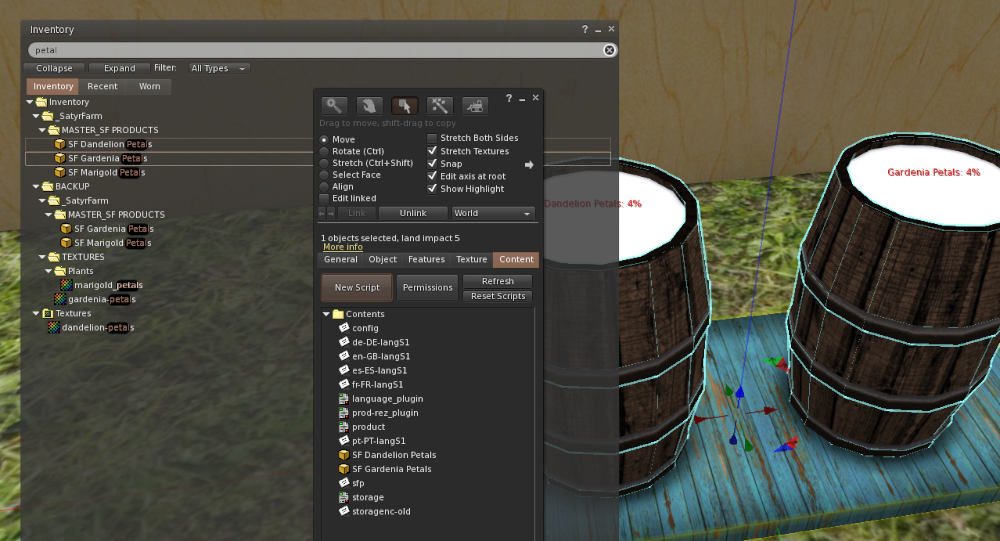
È quindi possibile cambiare le texture dal bianco vuoto a qualcosa di adatto al prodotto.
Se vogliamo fare un ulteriore passo avanti, possiamo impostare questo magazzino in modo che i prims degli indicatori si muovano verso l'alto e verso il basso per riflettere i livelli effettivi dei prodotti. A tale scopo, è necessario calcolare alcuni numeri da inserire nei prims indicatori .
Per prima cosa prendere nota della posizione degli oggetti: ci serve solo il valore Z
I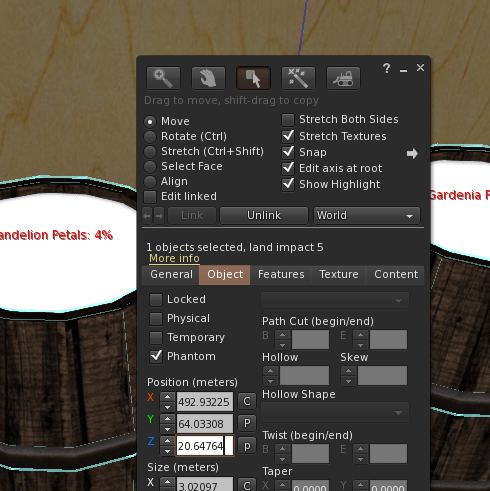 n questo caso è 20,64764
Poi prendiamo nota del valore Z del prims indicatore per quando ci mostra lo 0% e il 100%.
100% = 21.900
0% = 20.81450
Ora possiamo calcolare i valori necessari per la descrizione del prims
20.81450 - 20.64764 = 0.16686
21.900 - 20.64764 = 1.25236
Quindi ora dobbiamo solo impostare la descrizione del prim a 0,16686,1,25236
Poiché siamo interessati solo al movimento Z, possiamo usare gli stessi valori per entrambi i prim.
Per verificare che tutto funzioni, modificate la scheda di configurazione e impostate il livello iniziale al 100%.
LIVELLO_INIZIALE=100
Salvate la scheda e resettate gli script: dovreste vedere l'indicazione 100%. Ora modificate nuovamente la scheda e questa volta impostate il livello allo 0%.
LIVELLO_INIZIALE=0
Ora, quando si resetta, si dovrebbe ottenere la posizione 0%.
Modificare la scheda di configurazione per impostare il valore INITIAL_LEVEL al valore che si desidera utilizzare (il valore predefinito è 4) e si è pronti per iniziare a memorizzare le cose!
Dare un nome al magazzino
Potete rinominare il vostro nuovo deposito con il nome che desiderate, ad esempio SF Petal Store.
Se intendete utilizzare i prodotti di questo magazzino in combinazione con l'opzione AutoFeed delle mangiatoie per animali, dovrete semplicemente aggiornare la scheda di configurazione in modo da avere lo stesso nome configurato. Inoltre, se si utilizza SF Updater-Storage, è possibile aggiungerlo alla scheda di aggiornamento dei prodotti.
Modalità di condivisione
Questa modalità consente ad altri elementi, come lo scambio, di accedere all'unità di memorizzazione e di prendere una copia di qualsiasi elemento. Questa modalità non influisce sul livello di archiviazione. È un modo utile per estendere l'offerta di nuovi prodotti, come ad esempio la borsa valori.
Testo fluttuante
Per impostazione predefinita, un negozio mostra i livelli di tutti i prodotti che contiene come un unico elenco di testo flottante. Per i negozi che hanno molti articoli, questo può essere un po' difficile da leggere, per cui si potrebbe aggiungere ulteriori primari collegati per avere un testo fluttuante su ciascuno di essi che mostri lo stato dei singoli prodotti. Ad esempio, per le Olive SF si usa il prim collegato chiamato "Olive" per mostrare il testo sul livello attuale delle Olive SF. Si noti che la primitiva principale continuerà a mostrare i livelli di tutti i prodotti immagazzinati che non hanno una primitiva con il loro nome nell'insieme dei collegamenti.
Si tratta di una questione puramente estetica, poiché in questi prims extra non viene memorizzato nulla.
Impostazioni della scheda di configurazione
Probabilmente la voce principale della scheda di configurazione che potrebbe essere necessario regolare per il vostro nuovo negozio è REZ_POSITION
# A che livello deve iniziare il magazzino quando viene rizzato INITIAL_LEVEL=4 # # Quanto viene prelevato/aggiunto al momento dell'utilizzo ONE_PART=2 # # Quanti giorni prima che il livello faccia cadere 1 parte DROP_TIME=14 # # Qual è il massimo che questo negozio può contenere (100 dà i livelli delle scorte in %, maggiori di 100 danno i livelli come ad es.MAX_FILL=100 # # ASC per l'ordinamento ascendente (da A a Z) o DEC per l'ordinamento discendente (da Z ad A) SORTDIR=ASC # # Offset per il rez dell'articolo REZ_POSITION=<0.0, 0.0, 1.5> # # Quanto lontano scansionare gli articoli SENSOR_DISTANCE=10 # # Regione di condivisione del prodotto. Tutti condividono con tutti, Gruppo solo con lo stesso gruppo, Nessuno nessuna condivisione SHARE_MODE=All # # Impostare a 1 per consentire a qualsiasi membro del gruppo di utilizzare il pulsante del menu 'Aggiungi stock', a 0 per consentire solo al proprietario GROUP_STOCK_ADD=0 # # Colore del testo float - impostare come vettore di colore o utilizzare OFF per non avere testo float TXT_COLOR=<1.0, 1.0, 1.0> # # Luminosità del testo da 1 a 10 (10 è la luminosità massima) TXT_BRIGHT=10 # # Lingua predefinita LANG=it-GB # # Modificarla se i prodotti non iniziano con 'SF' SF_PREFIX=SF
Per saperne di più sul sistema di memorizzazione, consultare il capitolo 14
Questo lavoro di Buzzy Cnayl è rilasciato sotto licenzaCreative Commons Attribuzione-Non commerciale-Condividi allo stesso modo 4.0 Internazionale.
Basato su un lavoro dihttps://satyrfarm.github.io/
- Dettagli
- Read Time: 8 mins
9.1 - Storage wells
We have used the SatyrFarm Well and also the SF Water tower – these are both examples of the ‘storage well’ system. Items in this system gradually fill up and store one specific product and as long as the level is greater than the ‘one part’ setting you can take some of the product. For the SatyrFarm well it was water but we also can get rennet from the SF Rennet Container, yeast from the SF Yeast Container and sea water from the SF Sea Water pump etc.
There are various configuration options to allow you to put some restrictions on the system by specifying how the item functions. For example you can set that it needs to be close to something in order for the level to increase. You can specify an actual item or set it that it needs to be at sea level – the SF Sea Water pump is an example of the latter. We can also specify what ‘energy’ drives it and we can specify wind (like the first water tower we used that require a wind pump near them), grid (like the example shown in the section on electricity for setting water towers to use the grid), or ‘self’ (such as the SatyrFarm well)
	# Level to start at on rez/hard reset
	INITIAL_LEVEL=10
	#
	# What liquid is this system for
	LIQUID=Water
	#
	# How much to increase/decrease level by for one 'serving'
	ONE_PART=2
	#
	# How many days before level drops 1 part ('evaporation')
	DROP_TIME=2
	#
	# Offset to rez water buckets
	REZ_POSITION=<1.0, 0.5, 0.0>
	#
	# Set to 0 to disable menu and just rez product on touch
	MENU_MODE=0
	#
	# Set to 0 if you don't want to allow adding SF_WATER item via menu to top up level
	ACCEPT_PRODUCT=0
	#
	# Can be WIND, GRID, SELF or RELAY which relates to using Wind powered water pump, Electric pump, built in system or via another nearby storage-well
	MODE=RELAY
	#
	# In RELAY mode, where to get water from
	RELAY_WELL=SF Water Tower
	#
	# Set to 1 for clouds, rain and other effects
	WEATHER=1
	#
	# If WEATHER=1 set the range of the rain in m
	RAIN_RADIUS=35
	#
	# How often in seconds to increase level by ONE_PART if MODE=SELF
	WATERTIME=600
	#
	# SEA_LEVEL forces it to be at sea level to work. Can also specify item to scan for or remove/comment out if not needed
	REQUIRES=SEA_LEVEL
	#
	# radius in m to scan for REQUIRES item
	RANGE=6
	#
	# Default language
	LANG=en-GB
(A) Examples of the various settings
LIQUID=
This is the item that is produced such as water, sea water, yeast etc. If this item is not in the contents as a product (e.g if LIQUID=Water the the product is SF Water) the system will check with storage locations to try and find a copy and if it is unable to find it then it will show on float text that it needs that item.
MENU_MODE=
If set to 1 then menu mode is enabled and touching the item will give you a menu. If set to 0 this disables the menu and touching immediately rezzes the product. If you are using the NPC Farmer then the item that it uses to fetch water must be set this way.
ACCEPT_PRODUCT=
If menu mode is active, you can enable or disable the option to allow you to top up the storage well via the ‘Add’ button
MODE=
The options are WIND which requires an SF Wind Pump nearby, GRID which allows it to take power from the electricity grid, RELAY which allows you to link wells together and SELF which means it does not require energy.
REQUIRES=
If you enter SEA_LEVEL then the Z height position should be near to the regions Water Height setting in order for it to operate.
You can also specify the name of something that needs to be close to the well for it to work. As an example you may decide that for producing yeast, the well needs to be close to the SatyrFarm Distillery so you would edit the notecard to have the line:
REQUIRES=SatyrFarm Distillery
If you do not require anything for operation, just remove or comment out the REQUIRES= line
WEATHER=
Setting this to 1 will enable anyweather or other special effects system. You can find more information on creating your own weather and effects systems in chapter 13.9
9.2 IRRIGATION
Plants, animals and mining all require water. There are various ways to get the water to where it is needed and you can use one or a combination of the following:
(A) Manual watering
You take water from any of the storage wells that are set to give water. As the SF Water is product, you can touch it and have it follow you as you go to the item that requires water. Don’t forget you can have more than one bucket follow you but don’t get to ambitious – 4 or 5 is probably a good maximum! You can also use one of the watering carts if you don’t fancy to much walking!
Manual water means you don’t need to have any storage wells near things but you do need to keep an eye on water levels, as if they get to low for to long plants and animals may die on you!
(B) NPC Farmer watering
The NPC farmer can be used to water plants and animal feeders. You need to ensure that there is a storage well within the farmers range that has menu mode disabled, since the farmer expects to just touch it to get the water.
NPC farmers visit items on a relatively random basis and only know if to water an item when they visit it, so if you have too many items for the NPC to manage it may miss items that are in desperate need of water!
(C) Auto watering
Anything that needs water has an ‘auto’ option. Turning this on means the item will look to automatically get water from the closest source. Check the config notecard to see if there is an option to set the source, if not then it will be looking for a storage well called SF Water Tower The limit for searching is a 96m radius. Note also that if the closest storage-well found is not in the same group as the thing requesting it, an error message is given. If you have plants, animal feeders etc. That are close to a neighbours water towers, you may see this error message and then need to either move your items or put a water source closer to them.
Generally the water level can get quite low before the plant, feeder etc. Calls for more water. If you have to many items trying to get water from the one storage well then it’s possible the well may not be able to fill up quickly enough to meet the demand, and so you should keep an eye on how much things use.
As we have seen there are various ways to configure these water towers:
Wind mode
The ‘SF Wind Pump’ will start gradually filling with water after it is first rezzed and when it gets to 100% (about 2 hours from a fresh rez) it sends one portion of water to the closest item called “SF Water Tower” (note though that the maximum distance between the two can be no more than 96m) The wind pump will now continue to send one portion at regular intervals (approx 15-20 minutes)
If the demand on the water tower is too high it may run out of water before the next load is sent from the pump. A wind pump can only supply one water tower.
Grid mode
When the water level in a grid mode storage-well drops below about 40% it will send a request to the regional (electric) water pump for more water. The pump first checks there is enough power in the grid and if so will start and send water to the requesting storage-well.
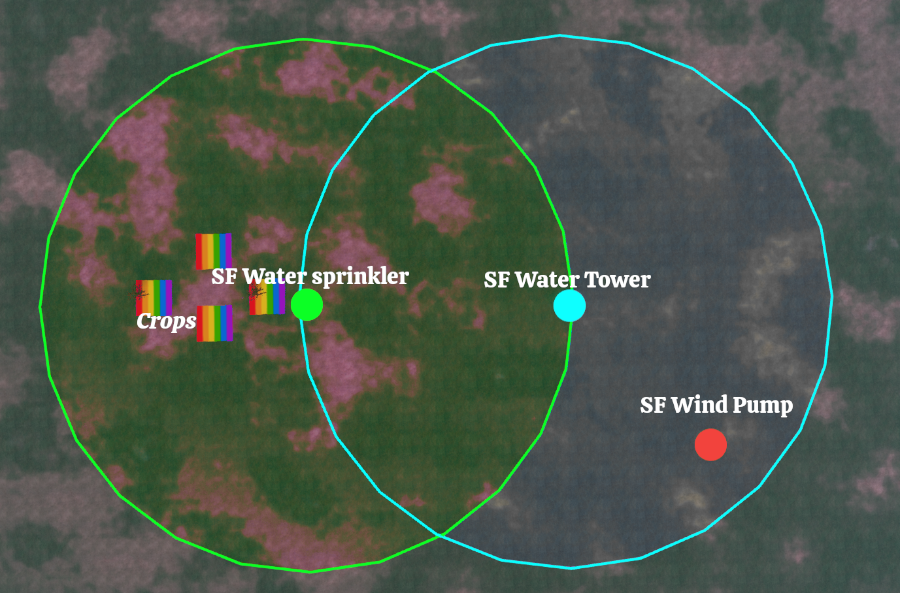
Relay mode
In relay mode you can set one storage well to get water from another storage well. As an example you could put out some SF Water sprinklers near your plants and set the plants to get their water from the sprinklers. Then you set the sprinklers to get their water from the SF Water Tower.
The blue circle shows the range of the main water tower and the green circle is the range of the water sprinkler. You could add more sprinklers anywhere in the blue circle to extend the range even further.
This work by Cnayl Rainbow is licensed under a Creative Commons Attribution-NonCommercial-ShareAlike 4.0 International License.
Based on a work at https://satyrfarm.github.io/
- Dettagli
- Read Time: 2 mins
2.4 - Getting assistance
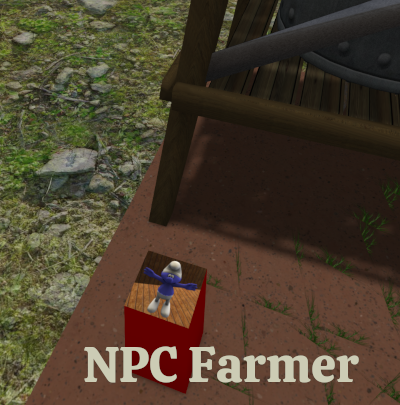
(a) The NPC Farmer
Perhaps you would like a ‘farm hand’ to help with odd jobs around the farm?
The pillar next to the water tower is the control system for an NPC Farmer (NPC means ‘non-player character’ see http://opensimulator.org/wiki/OSSLNPC)
We can have an NPC Farmer help us with some basic chores.
How does the Farmer NPC Work?
The Farmer NPC is constantly looking for farm items within range (set via the config notecard which we will cover soon). It will try to get water and then water plants with less than 30% water. The farmer will harvest plants and put their harvest in the configured storage location.
The farmer can also be set to cook slop and then store that away also. So the NPC Farmer can completely sustain a small farm, assuming that non-grass animal feeders have AutoFood set to on.
Troubleshooting
When rezzing an NPC , it should appear right in front of the rezzer box. If they are rezzed at the edge of the sim instead, this means you have closed access to your parcel. This will cause the NPC to fail. Please allow access to the parcel - the NPC will use the group of the controller and make sure age restriction is off.
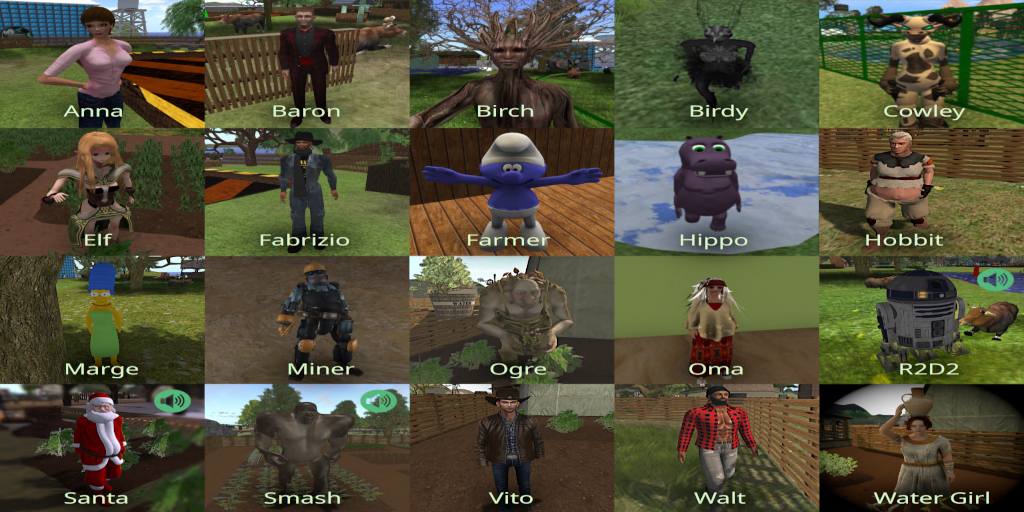
All currently available NPC Farmers
This work by Buzzy Cnayl is licensed under a Creative Commons Attribution-NonCommercial-ShareAlike 4.0 International License.
Based on a work at https://satyrfarm.github.io/
- Dettagli
- Read Time: 5 mins
2.1 Setting Up OpenSim
(a) Opensim - Versions and configuration
The VivoSim system has been built and tested to work on the official release versions of opensim 0.9.0.1 onwards. It supports both XEngine and YEngine. Anything that uses physics will have a note to tell you if it is designed for one particular type or can auto-sense the physics engine.
Please note that if you use builds other than that from opensimulator.org things may or may not work as I can't test every version, unfortunately!
(b) Setting Standard Permissions
Before using (or even rezing) any parts of this system in your region, you should ensure that you have the correct permissions for the required OSSL functions by editing the settings in the osslEnable.ini file (in bin/config-include folder) If you do not have access to this file you will need to get your region host to change them for you. Note that in newer versions of OpenSimulator you may need to copy osslEnable.ini.example to osslEnable.ini
[NOTE: in opensim ini files the ; symbol at the start of a line turns it into a comment. In the following, we comment out the first two lines and uncomment the next two]
  osslParcelO = ""
  osslParcelOG = ""
  ;osslParcelO = "PARCEL_OWNER,"
  ;osslParcelOG = "PARCEL_GROUP_MEMBER,PARCEL_OWNER,"
  ; osslParcelO = ""
  ; osslParcelOG = ""
  osslParcelO = "PARCEL_OWNER,"
  osslParcelOG = "PARCEL_GROUP_MEMBER,PARCEL_OWNER,"
Then add/edit the various function levels to:
; ThreatLevel  VeryLow
Allow_osSetDynamicTextureDataBlendFace = ${OSSL|osslParcelOG}ESTATE_MANAGER,ESTATE_OWNER

; ThreatLevel  Low
Allow_osMessageObject = ${OSSL|osslParcelOG}ESTATE_MANAGER,ESTATE_OWNER

; ThreatLevel  High
Allow_osMakeNotecard = ${OSSL|osslParcelOG}ESTATE_MANAGER,ESTATE_OWNER

; ThreatLevel  VeryHigh
Allow_osGetNotecard = ${OSSL|osslParcelOG}ESTATE_MANAGER,ESTATE_OWNER
Next, to make sure everything works as it should, change your active group to match that of the parcel that your farm is in. You should make sure all farm items are set to that group.
(c) Setting Permissions for NPC Farmer
If you plan to use any NPC Farmers then the following additional setting is required:
; ThreatLevel  Moderate
Allow_osSetSpeed=ESTATE_MANAGER,ESTATE_OWNER,PARCEL_OWNER
Also edit your OpenSim.ini
[NPC]
Enabled = true
(d) Setting Permissions for fishing system
If you plan to use the fishing system then the following additional setting is required:
; ThreatLevel  VeryHigh
Allow_osForceDetachFromAvatar=ESTATE_MANAGER,ESTATE_OWNER,PARCEL_OWNER
(e) Setting Permissions for VivoSim Exchange
If you plan to put out any exchange boxes then the following additional settings are required:
; ThreatLevel  Moderate
Allow_osGetGridLoginURI=${OSSL|osslParcelO}ESTATE_MANAGER,ESTATE_OWNER
(f) Setting Permissions for Rental system
The default ossl settings will allow the estate owner and managers as well as the parcel owner to use the rental system. If you are getting errors, or you wish to also allow group members to use it, you should set/edit the following:
; ThreatLevel  Moderate
Allow_osGetGridHomeURI=${OSSL|osslParcelOG}ESTATE_MANAGER,ESTATE_OWNER
(g) Dealing with errors
If you are getting permission errors make sure the above permissions are correctly set. You can get an OSSL Tester box at the VivoSim store on Mintor - rez this and it will check things are set up okay.
Next, to make sure everything works as it should, change your active group to match that of the parcel that you will rez the platform in. Anyone that is a member of that group will be able to interact with the farm. That group should have Object Entry and Run Scripts permissions.
If you have any problems setting the above up,
please do use the VivoSim forums to get assistance.
(h) Selecting languages
This guide and the default settings for all items is to use UK English, however, you can change the language items used from the @ button on menus. You can also edit the config notecard to set the default language.
If your preferred language is not shown please do let me know and I will look into adding it.
We are also grateful if anyone wishes to translate this guide into other languages (see https://translate.vivosim.net)
This work by Buzzy Cnayl is licensed under a Creative Commons Attribution-NonCommercial-ShareAlike 4.0 International License.
Based on a work at https://satyrfarm.github.io/
- Dettagli
- Read Time: 4 mins
These are the default settings for all animals. For all animals touching them and selecting Info from the menu will tell you all about them. You can edit the an_config notecard in animals to change what they eat from and more.
| Animal | Lifespan (~days) | Feeder | Milk/Eggs | Wool | Manure | Death items |
| Bantha | 200 | SF Feeder | SF Wool | ✓ | SF Meat, SF Skin | |
| Black Bear | 250 | SF Feeder | ✓ | SF Meat, SF Skin | ||
| Boar | 90 | SF Hog Feeder | ✓ | SF Meat, SF Skin | ||
| Bosk | 150 | SF Feeder | SF Bosk Milk | SF Wool | ✓ | SF Meat, SF Skin |
| Brachiosarus | 200 | SF Feeder | ✓ | SF Meat, SF Skin | ||
| Buffalo | 180 | SF Feeder | SF Milk | ✓ | SF Meat, SF Skin | |
| Bulldog | 200 | SF Dog Feeder | SF RIP | |||
| Camel | 100 | SF Feeder | SF Wool | ✓ | SF Meat, SF Skin | |
| Cat | 200 | SF Cat Feeder | SF RIP | |||
| Cow | 40 | SF Feeder | SF Milk | ✓ | SF Beef, SF Skin | |
| Crocodile | 200 | SF Tiger Feeder | SF Meat, SF Skin | |||
| Dolphin | 100 | SF Fish Feeder | SF Fish | |||
| Donkey | 50 | SF Feeder | ✓ | SF Meat, SF Skin | ||
| Duck | 30 | SF Chicken Feeder | SF Duck Egg | SF Feathers | SF Duck Meat | |
| Elephant | 200 | SF Feeder | ✓ | SF Meat, SF Skin | ||
| Elk | 60 | SF Feeder | ✓ | SF Meat, SF Skin | ||
| Farm Chicken | 30 | SF Chicken Feeder | SF Eggs | SF Feathers | ✓ | SF Chicken |
| Fox | 90 | SF Dog Feeder | SF Meat, SF Skin | |||
| Gem Dolphin | 120 | SF Fish Feeder | SF Fish | |||
| Giraffe | 200 | SF Feeder | ✓ | SF Meat, SF Skin | ||
| Goat | 40 | SF Feeder | SF Milk | SF Wool | ✓ | SF Meat, SF Skin |
| Great Dane | 200 | SF Dog Feeder | SF RIP | |||
| Hog | 90 | SF Hog Feeder | ✓ | SF Pork, SF Skin | ||
| Horse | 200 | SF Feeder | ✓ | SF Meat, SF Skin | ||
| Husky | 200 | SF Dog Feeder | SF RIP | |||
| Labrador | 200 | SF Dog Feeder | SF RIP | |||
| Leopard | 100 | SF Tiger Feeder | SF Meat, SF Skin | |||
| Lion | 150 | SF Tiger Feeder | ✓ | SF Meat, SF Skin | ||
| Llama | 100 | SF Feeder | SF Milk | SF Wool | ✓ | SF Meat, SF Skin |
| Monkey | 300 | SF Feeder | ✓ | SF RIP | ||
| Living Rock | 300 | SF Rock Feeder | SF Mineral | SF Clay, SF Rock Skin | ||
| Monster | 200 | SF Tiger Feeder | ✓ | SF Meat, SF Skin | ||
| Ostrich | 300 | SF Chicken Feeder | SF Ostrich Egg | SF Feathers | ✓ | SF Ostrich Meat, SF Feathers |
| Panda | 200 | SF Feeder | ✓ | SF RIP | ||
| Penguin | 100 | SF Fish Feeder | ✓ | SF Meat, SF Skin | ||
| Pet Rock* | 300 | SF Rock Feeder | SF Mineral | SF Clay, SF Rock Skin | ||
| Pig | 30 | SF Pig Feeder | ✓ | SF Pork, SF Skin | ||
| Polar Bear | 250 | SF Fish Feeder | ✓ | SF Meat, SF Skin | ||
| Rabbit | 30 | SF Rabbit Feeder | SF Meat, SF Skin | |||
| Rainbow Trout | 10 | SF Fish Feeder | SF Trout | |||
| Raptor | 100 | SF Tiger Feeder | ✓ | SF Meat, SF Skin | ||
| Reindeer | 60 | SF Feeder | ✓ | SF Meat, SF Skin | ||
| Rhino | 200 | SF Feeder | ✓ | SF Meat, SF Skin | ||
| Sheep | 40 | SF Feeder | SF Milk | SF Wool | ✓ | SF Lamb, SF Skin |
| Squid | 10 | SF Fish Feeder | SF Calamari | |||
| Squirrel | 200 | SF Chicken Feeder | ✓ | SF Meat, SF Skin | ||
| Stegosaurus | 200 | SF Feeder | ✓ | SF Meat, SF Skin | ||
| Swan | 200 | SF Chicken Feeder | SF Feathers | SF Swan Meat | ||
| T.Rex | 200 | SF Tiger Feeder | ✓ | SF Meat, SF Skin | ||
| Tauntaun | 200 | SF Feeder | SF Wool | ✓ | SF Meat | |
| Tiger | 100 | SF Tiger Feeder | SF Meat, SF Skin | |||
| Triceratops | 200 | SF Feeder | ✓ | SF Meat, SF Skin | ||
| Tuna Fish | 10 | SF Fish Feeder | SF Tuna | |||
| Turkey | 30 | SF Chicken Feeder | SF Feathers | SF Turkey Meat | ||
| Turtle | 150 | SF Feeder | SF RIP | |||
| Unicorn | 300 | SF Feeder | SF Horn | ✓ | SF Meat, SF Skin | |
| Water Buffalo | 120 | SF Feeder | SF Milk | ✓ | SF Meat, SF Skin | |
| White Rhino | 200 | SF Feeder | ✓ | SF Meat, SF Skin | ||
| Zebra | 200 | SF Feeder | ✓ | SF Meat, SF Skin |
* Pet Rock renamed to Living Rock from version 5.9 onwards
This work by Buzzy Cnayl is licensed under a Creative Commons Attribution-NonCommercial-ShareAlike 4.0 International License.
Based on a work at https://satyrfarm.github.io/
- Dettagli
- Read Time: 1 min
These are the default settings for all animals. For all animals touching them and selecting Info from the menu will tell you all about them. You can edit the an_config notecard in animals to change what they eat from and more.
| Animal | Lifespan (~days) | Feeder | Milk/Eggs | Wool | Manure | Death items |
| SF Black Larl | 150 | SF Larl Feeder | ✓ | SF Sable Pelt | ||
| SF Bosk | 30 | SF Feeder | SF Bosk Milk | SF Skin & SF Bosk Meat | ||
| SF Bounding Hurt | 200 | SF Feeder | SF Raw Hurt Wool | ✓ | SF Meat | |
| SF Farm Vulo | 30 | SF Bird Feeder | SF Eggs | ✓ | SF Vulo Meat | |
| SF Giani | 30 | SF Giani Feeder | SF RIP | |||
| SF Giant Tarsk | 90 | SF Tarsk Feeder | ✓ | SF Skin & SF Tarsk Meat | ||
| SF Jungle Larl | 30 | SF Larl Feeder | ✓ | SF Jungle Pelt | ||
| SF Saru | 200 | SF Veg Feeder | ✓ | SF RIP | ||
| SF Sleen | 30 | SF Sleen Feeder | SF Raw Wool | ✓ | SF Skin & SF Meat | |
| SF Snow Larl | 30 | SF Larl Feeder | ✓ | SF Snow Pelt | ||
| SF Snow Lart | 90 | SF Lart Feeder | SF Lart Pelt & SF Meat | |||
| SF Squirrel | 200 | SF Bird Feeder | ✓ | |||
| SF Tabuk North | 60 | SF Feeder | ✓ | SF Tabuk Meat | ||
| SF Tabuk Prairie | 60 | SF Feeder | ✓ | SF Tabuk Meat | ||
| SF Tarsk | 90 | SF Tarsk Feeder | ✓ | SF Skin & SF Tarsk Meat | ||
| SF Tawny Red Larl | 30 | SF Larl Feeder | ✓ | SF Tawny Red Pelt | ||
| SF Tharlarion | 30 | SF Tharl Feeder | ✓ | |||
| SF Tumit | 200 | SF Bird Feeder | SF Tumit Egg | ✓ | SF Skin & SF Tumit Meat | |
| SF Turtle | 30 | SF Veg Feeder | SF RIP | |||
| SF Verr | 40 | SF Feeder | SF Verr Milk | SF Raw Wool | ✓ | SF Verr Meat |
This work by Buzzy Cnayl is licensed under a Creative Commons Attribution-NonCommercial-ShareAlike 4.0 International License.
Based on a work at https://satyrfarm.github.io/
- Dettagli
- Read Time: 6 mins
Starter Kit – Basics
This platform contains everything you need to get started using VivoSim. If you are new to the system it is recommended to first get this box and rez the platform, then follow the tutorial at /information/user-guide
Once you have grasped the basics, you can then choose to expand if you wish using the various options in the other expansion packs.
Contents
SF Wind Pump
SF Water Tower
SatyrFarm Well
SF Feeder
SF Pig Feeder
SF Small Field
SF Square Field
SF Basic Storage
SatyrFarm Kitchen
SF NPC Controller
Pack 1 – Plants & Trees
In addition to the two fields found in the starter kit, this box contains additional plants and trees as well as two irrigation systems.
Contents
SF Big Tree
SF Maple Tree
SF Maple
SF Fig Tree
SF Olive Tree
SF Elder Tree
SF Oak tree
SF Horse Chestnut Tree
SF Walnut Tree
SF Coconut Palm
SF Flower Planter
SF Planter
SF Vine
SF Bramble
SF Marsh Field
SF Fungus
SF Wild Flowers
SF Physic Garden
SF English Herb Garden
SF Mediterranean Herb Garden
SF Fibre Crops
SF Water sprinkler
SF Water Tower (clouds and rain effect)
Pack 2 – Storage
Once you start expanding with new crops, animals, crafting etc, you will find the required additional storage systems here.
Contents
SF Storage Rack
SF Kitchen Storage
SF Fridge
SF Freezer
SF Spice Storage
SF Cake Storage
SF Bread Storage
SF Maple Syrup Store
SF Milk Storage
SF Meat Store
SF Dried Goods Store
SF Fresh Herb Storage
SF Herb Bench
SF Barrels Storage
SF Herbalist
SF Coldframe
SF Pet Supplies
SF Wood Storage
SF Wood Basket
SF Utility Storage
SF Craft Store
SF Crafting Storage
SF Clay Storage
SF Bulk Storage (juice)
SF Bulk Storage (slop & fish)
Bulk Milk Storage
SF Fuel Storage
SF Manure Storage
SF HaystackSF Vase
SF Store Barrel (yarn)
SF Store Barrel (wool)
SF Candle Storage
SF Keg Store
SF Barrel Store
SF Vase
SF Sea Water pump
SF Yeast Container
SF Rennet Container
Pack 3 – Animal extras
Once you start adding animals other than those used in the tutorial, you will need to have feeders specific to the animals needs. These are found in this pack. There is also a fishing system, bee hive and chicken coop. You can find out what feeder each animal feeds from using the ‘Information’ item on the animals menu or from the information at https://vivosim.net/help/animals
Contents
SF Feeder
SF Hog Feeder
SF Rabbit Feeder
SF Chicken Feeder
SF Tiger Feeder
SF Fish Feeder
SF Dog Feeder
SF Cat Feeder
SF Rock Feeder
SF Chicken Coop (standard and low prim version)
SF Beehive
SF Fishing
SF Fish Barrel
Pack 4 – Crafting
The items in this pack allow you to use the various products produced by plants, animals etc to make new items.
Contents
SF Crafting Workbench (2 styles)
SF Carpenter Workbench
SF Leatherwork
SatyrFarm Drier
SatyrFarm Loom
SF Spinning Wheel
SF Potters Wheel
SF Sewing Machine
SatyrFarm Extractor
SF Press
SF Shop (2 styles)
SF Smithy
SF Kiln
SatyrFarm Vat
Pack 5 – Eco converting
Converters take one ‘waste’ item and turn it into something useful!
Contents
SatyrFarm Compost
SF Quethane Generator
SF Privy (2 styles)
SF WC
SF Urinal
SF Potty (3 styles)
SF Toilet Roll Holder (2 styles)
SF Bookcase (2 styles)
Pack 6 – Food & Drink
If you have decided to use the HUD then food and drink are needed to keep you well!
Contents
SatyrFarm Wood Oven
SF Kitchen Oven
Extractor hood
SF Frying Pan
SF Hob
SF Sink
SF Salad Bar
SF Toaster
SatyrFarm Grinder
SF Hot Drinks Maker
SF Drinks maker (Soft drinks)
SF Drinks maker (Bar)
SF Blender
SF Ice Creams
SF Drying Rack
SatyrFarm Juicer (2 styles)
SF Cheese Maker (2 styles)
SF Butter Churn
SF Microbrewery
SatyrFarm Distillery
SF Wine Maker
SF Table
SF Seat (x4)
Pack 7 – Household
Although SatyrFarm started out as a farm, VivoSim extends into your house, turning it into a home.
Contents
SF Chair
SF Wardrobe
SF Wood Stove
SF Firepit
SF Shower (PMAC)
SF Dresser
SF Jewellery Box (2 styles)
SF Sink
SF Soap Dish
SF Bathroom Storage
SF Towel Rail
SF Bathtub
SF Bed (2 styles plus ‘bed prim’)
MLP Addon kit
PMAC Addon kit
Sit/Poseball Addon kit
Pack 8 – Region Power
You can use the items in this pack to set up a region wide power system.
Contents
SF Eco Generator – Water
SF Solar Panel
SF Wind Turbine (2 styles)
SF Water Tower (shiny style)
SF Electric Pump
SF Power controller
SF Generator
SF Charger
SF Electric Streetlight
SF Battery Storage
SF Treadmill
SF Electrical Addons
Pack 9 – Mining
You can mine and also grow various rocks and minerals with the items in this pack.
Contents
SF Mine
SF Pump Jack
SF Mineral Store
SF Gems (2 styles)
SF Gem Storage
SF NPC Controller (configured for SF Gems)
Pack 10 – Forestry
This pack adds new trees that are used to create woods/forests for growing and working withwood in its many forms.
Contents
SF Pine Forest
SF Maple Tree (doesn’t produce maple sap)
SF Small Maple Tree (doesn’t produce maple sap)
SF Birch Clump
SF Birch Tree
SF Larch Tree
SF Autumn Tree
SF Elm Tree
SF Shade Tree
SF Forest Store
SF Wood Seasoning
Contents - Extras
SF Saw Mill (updated version of that found in pack 11)
SF Leaf Composter
SF Campfire
SF Firepit (updated version of that found in pack 7)
SF Wood Stove (updated version of that found in pack 7)
SF Firewood Store
Pack 11 – Large items
As the name suggests, various large items can be found here. Make sure to rez the platform somewhere with lots of room.
Contents
Red Barn
SF Silo Storage (3 styles)
SF Windmill
SF Saw Mill
SF Oast House
SF Shop (2 styles)
Box 12 – VivoSim Exchange
The VivoSim Exchange lets you buy and sell items.
VivoSim HUD Box
Contains the VivoSim HUD along with other wearable items.
Contents
Main-HUD
Status-HUD
SF Pitchfork
Animal Rezzer Box
NOTE - The contents of this box are also found in the starter kit. You only need a copy of this if you already have the rezzer and a new version is released and you don't want another starter kit!
Contains the animal rezzer/updater and petifier.
Contents
Animal Rezzer
Petifier HUD
This work by Buzzy Cnayl is licensed under a Creative Commons Attribution-NonCommercial-ShareAlike 4.0 International License.
Based on a work at https://satyrfarm.github.io/
- Dettagli
- Read Time: 5 mins
2.2 Starting Out
(a) Rez the first platform
Okay, so now we are ready to rez the "START HERE" platform (found in the starter kit) The platforms all show you what size they will be when you rez them, so find a suitable space for this platform (that’s all we will be rezzing to start with).
A good idea can be to press 
 first, which activates the building Edit tool, so when you rez the platform everything will be selected and you can easily reposition it if necessary.
This platform contains everything you will need to get started and start learning how things work.
|
|
|
|
1 SF Wind Pump |
|
(b) Prepare for your first animals
A basic farm needs only a SatyrFarm Well and the SF Feeder and then it’s almost ready for certain animals (i.e. ones that can eat grass). Before we add our first animals, you may notice that the grass feeders are showing “DRINK WATER LOW” so we need to top them up. To do that touch/left click on the well and you will see a bucket of water appear.

If you now touch the bucket it will move towards you and then follow you as you walk about. So head over until you are standing next to one of the feeder barrels with the water bucket also near it. Touch the feeder and you will get a menu with various options. For now, just click on the button marked Add Water. The water will empty from the bucket into the feeder and you will see the levels increase and now it says that the grass needs watering.
Get another bucket from the well and this time when you touch the feeder for the menu, select Water Grass and after a few seconds you should have some lush grass and no more red warning text over the feeder. You might also notice that the well is showing the level as 80% - each time we take a bucket of water, the level drops and then it will slowly fill back up over time.
When we add animals, they will drink the water from the feeder, plus eat the grass so it will be up to you to keep topping up the water. As your farm grows, this may start to take up way to much of your time so there is a way to make life simpler!
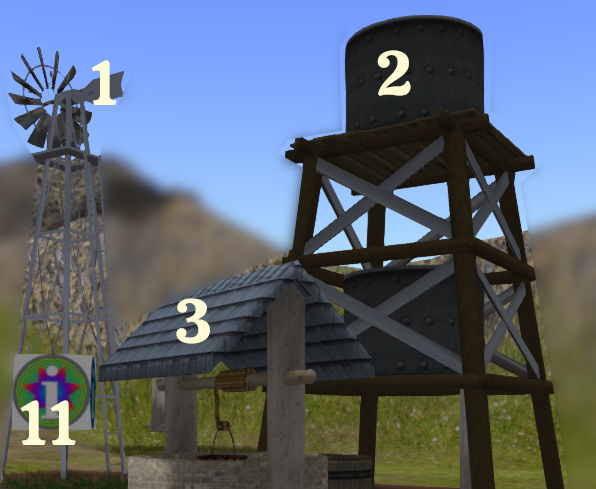
I’m sure you have noticed the wind pump and water tower? The wind pump draws water from the ground and feeds it into the nearest water tower. The water tower can then be used to automatically provide water for things that need it (at the moment just our feeder).
If you touch the second grass feeder to get the menu, you will see a button marked +AutoWater If you click this it will turn on the auto watering feature and the feeder will try to find a water tower within range (around a 90m radius) Once it finds the water tower you will see it automatically fills up. As long as there is enough water in the water tower your feeder will now never need you to add water to it – makes life easier for you doesn't it! You might want to select that option for the first feeder.
As your farm grows, you may need to add more water towers but we will cover that in more detail later on as for now, there should be plenty of water available.
(c) Add your first animals
In your inventory open the Platform 1 folder you will see an item called QSF Animal Rezzer – Quintonia-Vx (where x is the version number)
You can either rez this to the ground or select to wear it (it will be worn as a HUD), whichever you prefer.
The animal rezzer is where animals come from initially. It’s also used to update animals when new updated scripts are released.
If you have rezzed it, move it to where you would like your animal to appear (ideally next to one of the grass feeders). If you are wearing it as a HUD, the animal will be rezzed at your feet, so stand where you wish the animal to appear.
Touch the HUD/box to get the menu and select the Rez… button. There are a lot of animals to choose from but only certain ones eat grass so we will just start with those. Let’s start with a Cow. When you rez it, give it a few seconds to initialize and then you will see a happy cow!
Note that your cow may be a different colour – some animals have ‘genetics’!
When your animals become adult, you can mate them so you may choose to rez another cow in anticipation of that time!
By default, the rezzer will alternate between producing male and female animals but you can change it to be random if you prefer from the options button.
You may also wish to rez a couple more animals – choose from goats or sheep (since both can eat from the grass feeder.)
So now you have your basic farm set up, the animals will eat from the feeders (which are getting water from the water tower) and will grow day by day until they become adults.
Congratulations, you are now officially a VivoSim Farmer!
This work by Buzzy Cnayl is licensed under a Creative Commons Attribution-NonCommercial-ShareAlike 4.0 International License.
Based on a work at https://satyrfarm.github.io/